BETTER.
BADDER.
CORDLESS.
Industry-Best Pipe
& Tube Products
Custom Machining
& Field Services

At Tri Tool, we cut through complexity and provide industry leading custom solutions, off-the-shelf pipe beveling and flange facing tools, and expert field services for piping and tubing. For more than 50 years, we have partnered with companies in major industrial markets—aerospace, government and defense, life sciences, power generation, oil and gas, and semiconductor—to design, develop, and manufacture precision machining and custom engineered tools that increase productivity, optimize costs, and accelerate delivery.
Combining proven expertise with unrivalled experience and extraordinary ingenuity, we go above and beyond expectations to deliver solutions that propel you forward. Unconventional innovation with extreme agility and proven results, solving your toughest challenges, anywhere, and in record time—that’s our thing.

Government
Government
We understand the unique challenges our customers face and we rise to each and every challenge, every day.

Semiconductor
Semiconductor
Because we know failure is not an option, we are uncompromising in our commitment to your success.

Oil & Gas
Oil & Gas
Our rich 45-year history within the oil & gas industry has resulted in Purpose-Built tools engineered for durability and reliability.

Power Generation
Power Generation
We've approached each project with a fierce determination, not only to succeed, but to outperform.

Aerospace
Aerospace
We see unconventional problems every day. Our approach eclipses ordinary thinking and keeps you on the cutting edge.

Life Sciences
Life Sciences
When problems call, we answer. Our life sciences customers require access to unique and reliable tools.
Find The Right Tool For The Job
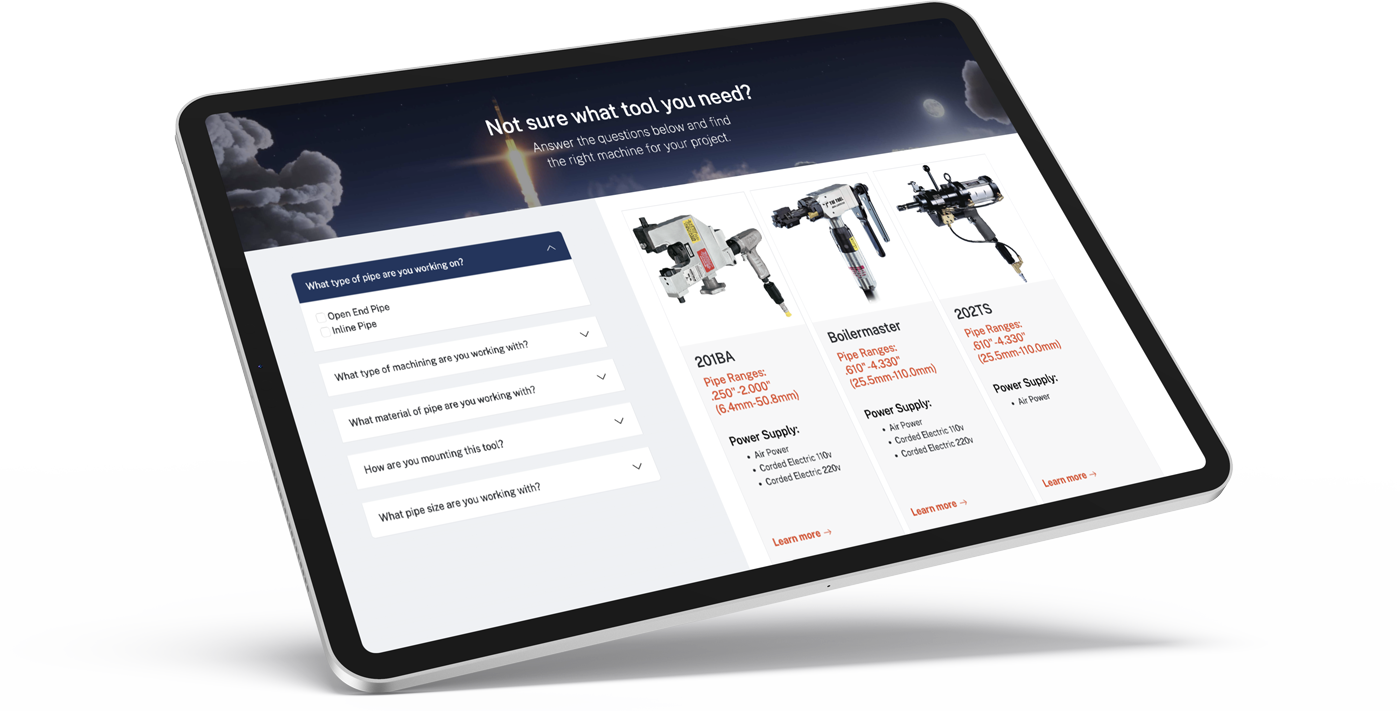
Our tool configurator will walk you through the process of selecting the proper tool.
Products & Services
Custom
Machining
Custom-engineered to solve unique problems, our custom machining solutions provide the highest performance and quality.
Product Catalog
Built with reliability and for performance, day in and day out. PurposeBuilt machines are the workhorses that get things done.
Equipment Rental
We offer both as-needed and subscription rental programs to ensure our customers have the tools they need when they need them.


Experience
Tri Tool
Our customers enjoy a different kind of dedication. From leadership and training to engineering and manufacturing - we go beyond.

A New Way of Thinking
Our customers benefit from our years of engineering combined with a fresh approach to problem-solving.
A Trusted Partner
Partnership requires dedication and commitment at every level. On every project. Every day.
A Different Focus on Success
It's not just meeting a scope of work. It's determination not only to succeed, but to outperform.
Because this was presented as an emergent need, we went with a company we’ve used before and trust. Tri Tool was able to mobilize a team immediately. It took them six days to execute the entire repair. The professionalism of their project manager, machinists and welders was exemplary and the quality of their work was beyond compare. They took ownership of what we needed them to do without us having to provide direct oversight. I will continue to work with Tri Tool and highly recommend this company.
Years of Service
Unique Tools
and Bits in the Field
of Satisfied Customers
Countries
Served
Press Releases
News Articles
Tri Tool Technologies Voted Among Top Manufacturers In the State of California
Tri Tool Technologies, a California-based pipe and tube tooling manufacturer, announced their remarkable 16th place finish out of 112 nominations in the Making CA statewide competition of manufacturers hosted by the California Manufacturers & Technology Association (CMTA.)
Tri Tool Technologies Announces Cody Van Cleave as New Sales Account Manager
Tri Tool Technologies is proud to announce the promotion of Cody Van Cleave to the role of Sales Account Manager.
Tri Tool Technologies & Ballard Industrial Announce Strategic Partnership
Tri Tool Technologies, a leading provider of industry-best pipe and tube products, custom machining, and field services, announced today it has entered-into a strategic partnership with Ballard Industrial, a well-known purveyor of industrial supplies, services, and solutions.
Tri Tool Technologies Expands with Fourth Location in Merritt Island, Florida
Tri Tool Technologies, the leading provider of industry-best pipe and tube products, custom machining, and field services, is excited to announce the opening of its fourth location on Florida's Space Coast.
Pipe-101: Flanges & Flange Facing
Read about pipe flanges and the types and techniques of flange facing for today's heavy industrial markets, such as Power Generation, Oil & Gas, Nuclear Power, Government and Ship Building.